Contest

Win Rihannas new album Talk That Talk!

Dagger and Arrow GET WET TOUR!

Dagger and Arrow will be touring the province this summer, complete with t-shirts and giveaways for everyone!

Hair and Pregnancy

What to expect from your hair when you are expecting!

Dreads! Do's and DON'T's

Everything you need to know about starting your dread journey!

How to handle awkward questions! "Can I touch your hair?"

Find out great ways of answering taboo questions from curious people.

Monday, May 21, 2012

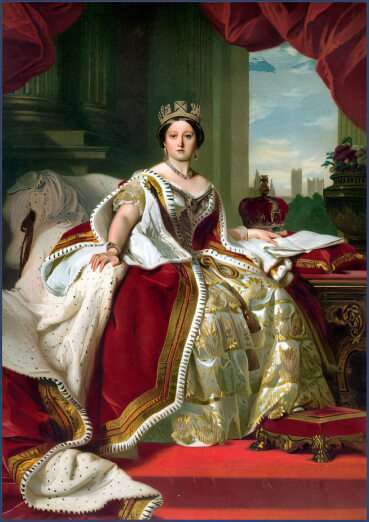
Queen Victoria


Today here in Canada it is Victoria Day. We take this day to remember one of the greatest women in history. Unfortunately not many of us know just how grad this woman really was (I mean, come on!She has a whole era named after her!) or what it was that made her so famous. Fortunately for those who don’t know about her, this week we are focusing on the real Wonder Women of our time. First let’s start with Queen Victoria.

Called the Empress of India, queen Victoria was the daughter of the Duke of kent, who would have taken the throne had he not died the same year as his father King George.  As you may have assumed, with the king and the duke both gone the throne was up for grabs, and when she was 18, Victoria decided to finally take her throne.

Though it would be looked down upon today, Victoria married her first cousin Prince Albert (yes THAT prince Albert). They had nine children and thirty-four grand children, all together thirty-five of her children and grand children went on to marry royals in other parts of the world earning this wonderful mother the name Grandmother of Europe.

After the Indian Rebellion of 1857, the British East India Company, which had ruled much of India, was dissolved, and Britain's possessions and protectorates on the Indian subcontinent were formally incorporated into the British Empire. The Queen had a relatively balanced view of the conflict, and condemned atrocities on both sides. She wrote of "her feelings of horror and regret at the result of this bloody civil war" and insisted, urged on by Albert, that an official proclamation announcing the transfer of power from the company to the state "should breathe feelings of generosity, benevolence and religious toleration". At her behest, a reference threatening the "undermining of native religions and customs" was replaced by a passage guaranteeing religious freedom.


On 14 December 1878, the anniversary of Albert's death, Victoria's second daughter Alice, died of diphtheria. Victoria noted the coincidence of the dates as "almost incredible and most mysterious"
Victoria Day is marked here by fireworks and I have always wondered why? Besides the fact that it is her birthday, why have fireworks? Well the queen herself was fond of large celebrations. In fact to celebrate her Diamond reign there was a procession in the streets that Mark Twain said “spanned farther than the eye could see, in either direction!” She even went as far as putting of celebration of her being the longest reigning queen for a whole year, so that it would coincide with her diamond anniversary celebration. Making it a massive shin-dig to say the least!

At the end of her reign, the Queen's full style and title were fittingly: "Her Majesty Victoria, by the Grace of God, of the United Kingdom of Great Britain and Ireland Queen, Defender of the Faith, Empress of India." She had type 1c-2a normal wavy hair. If you have her hair type try these tips!
-Use a sulfate free shampoo to get the most body for your wave.
-Use a volumizing brush and volumizer
 -Make sure to use products that encourage moisture yet don’t weigh down your hair.

If you are in the GTA and are heading down to Ashbridges Bay (Coxwell and Lakeshore) to see the wonderful fireworks, give us a shout we will be down there as well!  Here is a full schedule of the fireworks!
Fireworks displays: 

Ashbridges Bay Park (Coxwell Avenue and Lake Shore Boulevard, Toronto)
Monday, May 21 at 9:45 p.m.

Prince Charles and Camilla, the Duchess of Cornwall, will attend the display!


Friday, May 18, 2012

Grad Hair 104

Today we wrap up our Graduation focus! Hope you all enjoyed trying all these styles and to congratulate one lucky graduate we will be giving away a special prom/graduation prize pack to the lucky grad who sends us a photo of themselves wearing one of these styles! You will receive a gift certificate for Dagger & Arrow, along with one of each product from our new line! winners will be announced next week during our "Inspiring Women" focus. Good Luck and enjoy!


Bold Bubbly Pony

How to Get the Look:
Step 1: Apply a texturizing cream all over, then slick back hair into a ponytail. Secure tightly with an elastic.
Step 2: Tease your entire pony with a rattail comb — this will give it the body to create the big bubbles.
Step 3: Take an elastic and wrap it around the center of the ponytail, then wrap another elastic three inches from the ends. Fluff out the hair in between the elastics to create the bubble shape.

Big Bangs

How to Get the Look:
Step 1: For soft, full waves, apply a golf-ball-size dollop of volumizing mousse to damp hair. Massage the mousse from roots to tips, then let your hair air-dry.
Step 2: Create soft volume by teasing the hair at your crown. Loosely pull back the sides of your hair with your fingers, and secure with a barrette in the back, just below your crown. Next, curl the hair that's left down by wrapping two-inch sections around a one-inch-barrel curling iron. Smooth your bangs to the side with the curling iron, moving quickly from root to tip.
Step 3: Add depth to your hair color with color-boosting drops — the dimension and shine actually make your hair look fuller. Smooth it on the ends of your bangs and on random pieces throughout.

Rumpled Side Pony

How to Get the Look:
Mess up your pony in the flirtiest way with volumizing mousse. Work just a little through your hair after washing. Then bend over and dry with a diffuser.

Tip: If you have straight hair, create texture by braiding two-inch pieces of hair the night before and shaking it out in the morning. Make a zigzag side part, gather hair into a loose side pony, and wrap a silky bow hair tie around hair and secure. Puff the hair over the hair tie a bit and let some face-framing pieces fall out to give the pony a looser feel.

Fishtail Braid

How to Get the Look:
Step 1: Spritz a conditioning spray all over dry hair for shine, then create a side part.
Step 2: Braid hair into a fishtail, starting two inches from the hairline opposite the side part: Working with two sections of hair, pull a skinny strand of hair from the outside of the left section and add to the right side. Repeat on the right side. Do this technique until you get to the ends, then secure with a leather band.
Step 3: Pull out the sides of the braid slightly to give the braid a messy boho feel and to create those cool, wispy flyaways.

Thursday, May 17, 2012

Grad Hair 103

Here are five more great styles perfect for graduation, prom or any other event you feel like! Enjoy!

Bejeweled Braid

How to Get the Look:
Step 1: Rub a pump of gel between your palms, then rake through your hair — this will help your braid hold its shape.
Step 2: Secure a low ponytail at the nape of your neck. Find a pretty ribbon or beaded string, and tie it around the base of your pony.
Step 3: Braid your hair, incorporating the ribbon by weaving it in with one of three sections in your pony. Pull out a few curls around your face for a sweet finish.
Tip: If you can't find ribbon, use a necklace you have at home to weave into your braid.

Romantic Twist

How to Get the Look:
Step 1: Define and defrizz your curls by finger-combing a curl cream through dry hair.
Step 2: Gather all of your hair into a French twist and lay it against your head. Anchor your hair with pins, leaving the ends loose.
Step 3: Pull pieces out around your face and slide in an eye-catching headband for a girly effect.
Tip: Refresh face-framing tendrils by running your fingers under water, then wrapping hair around them.

Loose Ponytail

How to Get the Look:
Step 1: Use a rattail comb to tease a couple two-to-four-inch sections of hair along the crown of your head to create volume.
Step 2: Gather your hair into a low, loose ponytail (making sure there is hair covering the area you teased) and secure it with an elastic band at the nape of your neck.
Step 3: Clip a flower onto the elastic, placing it slightly off center so you can see it from the back and the front.

Cornrow Braids

How to Get this Look 1. Part your hair on your left side. Start braiding to the right of the part along your hairline.

2. As you braid, add in pieces from both sides to continue down the side of your head, but as you add the pieces, pull them underneath the braid. This creates an inside-out French-braid look.

3. Braid down to behind your ear, then stop adding pieces. Finish braiding regularly to the ends and secure them with an elastic.

Grecian Ponytail

How to Get the Look:
Try a banded ponytail! First, tease the top of hair; then, starting at ear level, part hair horizontally to create two ponytails. Tie them together, and secure each inch until the ends meet. Loosen hair between the elastics to add texture.

Wednesday, May 16, 2012

Grad Hair 102

Its still grad and prom week! and as promised here are five more sexy styles perfect for graduation and prom!  

The Bump

How to Get the Look:
Step 1: To create some volume on top, curl the roots of your hair in two-inch sections just once around a large-barrel curling iron. Curl the entire section between your hairline and crown, from temple to temple.
Step 2: For even more fullness, tease the roots of the hair you just curled with a mixed-bristle brush. Then use the same brush to smooth out some hair over it.
Step 3: To keep your bump from deflating, take a two-inch section of hair above each ear, twist it, and secure with bobby pins in the back of your head, below your crown. Use a light hairspray so your twist will stay in place and to tame flyaways.

Twisted Bun

How to Get the Look:
Step 1: Make a deep left-side part and gather the top section of hair from your forehead to your crown. Apply a squirt of texturizing spray, and then roll the hair away from your part to form a tight twist. Hold the twist tightly while you grab an elastic.
Step 2: Pull the rest of your hair into a low pony behind your left ear, and secure the ends of your twist in the ponytail too. Separate the pony into two sections. Twirl one section into a twist, and wrap it around the elastic to make a small bun, leaving the hair in the other section loose.
Step 3: Pin the ends of the small bun against the back of your head. Next twirl the rest of your loose hair into a twist, and wrap it around the outside of the smaller bun; pin the ends underneath. Smooth flyaways with a dab of 

Glam Braids

How to Get the Look:
Step 1: Keep hair in place by creating a deep side part, then use a mixed bristle brush to smooth down flyaways and frizz.
Step 2: Apply a small amount of pomade to your fingers to give shine and hold to the braid. Start French-braiding a three-inch piece of hair at the full side of your part.
Step 3: Pull the rest of your hair into a low side ponytail. Wrap the ponytail around its base to form a bun. Secure with bobby pins.
Step 4: Hold your style in place with a mist of light-hold hairspray. Apply a little extra on the braid to keep it from unraveling.

Boho Braids

How to Get the Look:
Step 1: Blow-dry hair straight to make it easier to braid. Part your hair in the center.
Step 2: Separate out a 1-inch section on both sides of part — two inches back from hairline. Take a 2-inch piece above each ear, and clip out of the way. Pull the rest of hair into a low bun. Bobby-pin it against the nape of neck, and tuck in the ends.
Step 3: Braid each of the top sections down; pin the ends into your bun. Then braid the side sections over the top of your head. Pin the ends against your head, and smooth them with pomade.

Romantic Ringlets

How to Get the Look:
Step 1: For perfect pin curls no matter what your texture, wrap three-inch pieces of damp hair around your finger as if it were a curling iron; slide finger out and pin curls to your head.
Step 2: Remove the pins, then define your curls by scrunching a golf-ball-size amount of Dagger & Arrow GELI to define clurs.

Tuesday, May 15, 2012

Grad Hair 101


Keeping with this weeks prom theme, here are some amazing styles found my by Amanda Pressner of seventeen mag. Enjoy!

Roman Ponytail

How to Get the Look:
Step 1: Comb your hair back into a sleek ponytail at the crown of your head. Use a fine-tooth comb to help smooth any bumps.
Step 2: Dip your fingertips into Dagger & Arrow Butter Cream, then lightly run them over your hair — it will maximize shine and fight frizz all night long.
Step 3: Tie a metallic piece of silk cord around the base of your pony, leaving two long pieces on either side. Crisscross them down the length of your pony. When you get to the end, wrap them around tightly a few times, knot the cord, then snip the excess.
Tip:
Gently pull sections of your pony with your fingers for a more volumizing shape.

Sleek Twist

How to Get the Look:
Step 1: Blow-dry your hair straight, using Dagger & Arrow Butter cream or GELI to keep it smooth and add hole, then part it on the side.
Step 2: Split your hair into pigtails, and begin twisting each side, starting from your temples and working you way back.
Step 3: As you reach the nape of your neck, twist hair tighter until it coils against itself. Use bobby pins to secure the coils against the back of your head.
Step 4: Mist all over with shimmer spray.

Silky Curls

How to Get the Look:
Step 1: Apply a texturizing product to freshly washed hair, then blow-dry on a low speed with a diffuser attachment — it will help bring out even more texture.
Step 2: With a small dab of Dagger & Arrow GELI on your fingertips, sweep your hair to one side, leaving it loose and flowy. On the same side, separate a three-inch section from just above your ear and roll upward into a twist, and bobby-pin it.
Step 3: Using a boar bristle brush, gently brush out the rest of your hair to loosen the curls and make them look softer.

Crazy Crimps

How to Get the Look:
Step 1: Mist dry hair with a thickening spray. Crimp two-inch sections, clamping the crimper as close to the roots as possible. Hold in place for a few seconds, then move down the length of hair. Crimp the whole head except for the front.
Step 2: To fluff out your crimped strands, tease them with a brush: Hold the ends of a two-inch section straight up, then brush it toward the roots until each piece is majorly full.
Step 3: Brush back the front section of hair, and secure at the crown with an elastic. Spritz the front with Dagger & Arrow Spritz to smooth down flyaways and add shine.

Fancy Chignon

How to Get the Look:
Step 1: Braid a two-inch section of hair at your hairline toward the back of your head, and secure with an elastic.
Step 2: Gather the rest of your hair along with the braid into a ponytail, and secure with a rubber band. Tightly twist your hair into a smooth side bun. Fasten in place with a few bobby pins.
Step 3: Pin three sparkly clips along your braid, then smooth on Dagger & Arrow Butter Cream to add a glossy sheen.
Tip: Tame any frizz along your hairline by smoothing on a dab of Dagger & Arrow Deep Conditioner with your fingers.

Come back tomorrow to get FIVE more awesome styles!!

Monday, May 14, 2012

Prom and Grad Week!


Ah yes! Prom and graduation, the time that every high school girl who has dreamed of being ‘Prom Queen’ has waited for. Also the time that everyone in college has waited and worked hard for, for the last 3+ years. In celebration of prom/grad this year, we decided to focus this weeks posts on prom and grad hair. Today we're going to look at five tips on how to get length before prom.

  1)      Protective Styling- Styling your hair in a protective style such as braids or twists will give your hair an ideal environment for growth. Safe from breakage and elemental damage, protective styles are a MUST, especially  if you have curly hair.

  2)      Moisturise- Use Dagger & Arrow Butter Cream to keep hair moisturised soft. Remember once it has emerged from the scalp the hair on your head get no more help from the tissues that created. It literally is hanging there by a thread! You must do your best to make sure your hair is quenched, not dry and fragile.

    3)   Stretching your hair- This may sound odd, but did you know when it comes to lengthening, hair is at least 5% elastic? Hair in its natural state is highly composed of keratin. In its natural state keratin A looks like a tight spiral. However if you were to say, braid your hair after the shower forcing it to dry in its stretched state, that keratin will then be arranged into keratin B, a more elongated form of keratin. The hair then enters and state called ‘floating’ where it can elongate by 25% and without effort the keratin A is now Keratin B.

   4)      Watch the water!- Water is good for hair to an extent. It does a good job of swelling the shaft and allowing for natural ingredients to penetrate your hair without much damage. In fact the affect that water has on hair is the reason most hair dye is liquid! However too much of one thing is never a good thing. When you take a shower make sure to dry you hair with a t-shirt and close those cuticles with Dagger & Arrrow Butter Cream! Unlike a towel, a t-shirt will soak up excess water and has less of a chance of sapping the vital oils from your hair.

Sebum.
   5)      The more greasy the better- Believe it or not grease on your hair is actually known as sebum. Your hair needs this sebum. It protects the hair from the elements as well as flexibility and shine. When you cleanse your hair, try not to scrub too much!


Hope you all enjoyed these tips!Check back for more prom and grad hair tips all this week!

Friday, May 11, 2012

The Ever Sweet Cerise


To celebrate Mothers day (early) I have decide to focus our Friday post on my very own mother Cerise Fairfax. Surprise mom, love you!

My mother Cerise is an inspirational life coach, who has worked with the likes of Mark Strong, Devo Brown, DJ Starting from Scratch and many more! Currently residing in the beautiful downtown city of Toronto, she writes horoscopes for more than five publications across Canada! 
Being someone who has always been focused and able to overcome adversity she has been changing lives and giving advice to virtually hundreds of people for more than 20 years!

Born in Ontario My mother grew up in the heart of down town Toronto with her three sisters (Autumn, Darla and Audra) and her brother (Keith). Though her childhood was not always easy growing up in Regent Park, she made the best of whatever hand she was dealt and excelled as an individual and strong leader.


Having a locally renowned picker/upholsterer and a funkdafied Native-Afro-American for parents, it was only natural for my mom as a teen to hold on to her leadership qualities and became a trend setter in her neighbourhood- in fashion, music and beauty. Much like her father before her she found a creative outlet in antique hunting and thrifty finding, she would make her own clothes, jewelry and even hair gel! Inspired by the architecture of old cabbage town and the surrounding area, my mom had a pop-punk style all her own.

Through the years I have watched my mom change and grow, especially her hair. It has been bobbed, dyed bright pink, brown and blonde. It’s been teased, blow dried and pinned. It’s been braided and straight as well as naturally curly but most of all it has been loved!

My mother Cerise has amazing type 3C curly hair. If you have this type of hair, try these tips!

-Condition your hair! Hydration is key when you get into the more curly types of hair. Breakage occurs in this hair type more often and hydration will stop your hair from drying out and breaking off. Try Dagger & Arrow Butter Cream to lock in moisture after the shower.

-Take your time with this hair and treat it delicately. Remember if you get what you pay for when it comes to hair products so don’t scrooge out on your hair!

-Try wet sets to control frizz and fly away hairs, and remember to use Dagger & Arrow GELI to nourish your hair and maintain style.